Discover the Magic Wand for Image Adjusting
|
In this set of tutorials we’re going to do some more
image adjusting.
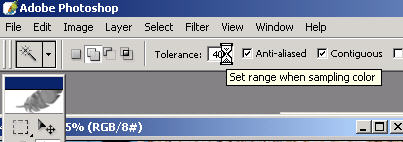
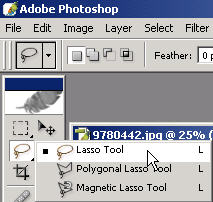
Right click on the wand tool and you have a few options. After you have made your initial selection by clicking on a point within the image you can choose Grow or Similar. ‘Similar’ will take and expand the selection across the entire image looking for similar tonal range.
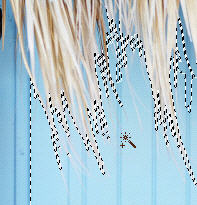
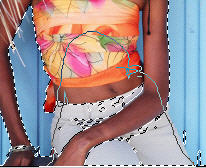
Don’t let the marching ants confuse you. All you’re doing is wanting to end up with a ‘selection’ of the blue background wall.
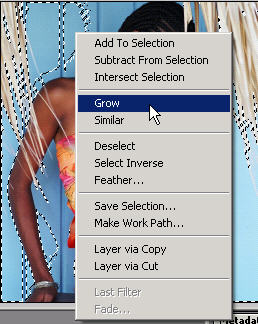
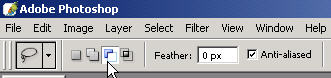
Now try right click and ‘Grow’. This will expand the selection area that is closer to the latest wave/click of the wand. Note that you should be on “Add to selection” in the options bar (otherwise you’ll just get one new chance to make a correct selection each time).
On ‘add to selection’ you can just keep clicking on certain areas that may be a little darker like these cracks in the wall to ‘add’ them to the selection job you’re doing.
You can use the zoom tool to get in there for a closer look and get more accurate selections.
The Hand tool works great when you are zoomed in.
You can also hold down the space bar to temporarily get the hand
tool when using a tool. Switch back to your wand (W) as your
selection will still be there (unless you stray from the TutorialKey
training and lose your selection already before we move on).
Here’s an example of using different tools in
getting selections; something that is covered in practicum in the
Photoshop CS Video Tutorials Training Program.
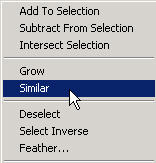
and choose ‘Subtract from selection’.
If there are areas that were accidentally ‘added’ to the selection you can ‘subtract’ them. For example here we don’t want any part of her selected as part of the blue wall so take your lasso and draw around these areas to ‘subtract’ them from the desired blue wall selection.
It took me a longgg time to finally understand which way to select with add or subtract to. So if you think you’ve got it now; great! (You’re sure to still benefit from the complete Photoshop video training I offer). Here we’ve selected the background in a little bit more advanced of a selection starting to use a few different options in getting our selection (leaving the girl and dead palm tree branches behind).
|
TUTORIALSTRAINING.COM
& TutorialKey Solutions c/o DreamCore Productions, Ltd.
5140 STONEY BROOK RD. RUDOLPH, WI 54475
715-423-2161
Contact me for any questions.
|
Copyright TutorialsTraining.com & TutorialKey Solutions 2005 Adobe, Photoshop, and the Adobe Certified Expert logos are either registered trademarks or trademarks of Adobe Systems, Inc. in the U.S. & other countries. Adobe Product Screen Shots reprinted with permission from Adobe Systems, Incorporated. TutorialsTraining.com & TutorialKey Solutions, PhotoshopDesigner.com, PhotoshopDesign.Net, ClubCast.tv, PhotoRestorationTutorials.com, PhotoRetouchingTutorials.com, Digital-Scrapbooking.net, Scrapbook-Templates.com, are trademarks of DreamCore Productions, Ltd. U.S.A. NAPP is a trademark of PhotoshopUser.com. Use of other trademarks or logos does not imply endorsement from the respective sources. |